3 KIRKLANDS CHRISTMAS DUPES YOU CAN MAKE TODAY
(Note: Some of the links provided are affiliate links. This means, at no additional cost to you, I will earn a commission if you click through and make a purchase which, in turn, helps me keep making these tutorials for you! You can read our disclosure policy here.)
3 Kirkland’s Christmas Dupes You Can Make Today!
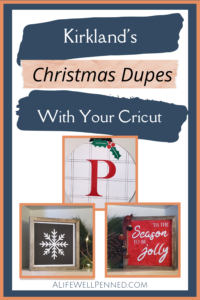
Today we’re making three holiday décor pieces inspired by items found at Kirkland’s.
I love seeing all the new Christmas items at the Kirkland stores but I have a problem – I don’t want to purchase too many pricey pieces to update my decor. Can you relate?!

Creating these Kirkland Dupes with your Cricut is the answer!
Today I’m creating three items directly inspired by pieces for sale at Kirkland’s. The best part is you can create all three of these in no time at all – and it’s possible you already have the supplies you need around the house!
What’s great about creating your own pieces is that you can custom make them to whatever size you need!
Both of the wall plaques we’re making today are sold in much larger sizes at the store, however, I needed them for a shelf so I wanted to keep them around 8” square.
IF YOU PREFER A VIDEO YOU CAN WATCH “THREE KIRKLAND’S CHRISTMAS DUPES YOU CAN MAKE TODAY!”
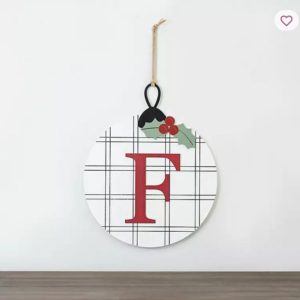
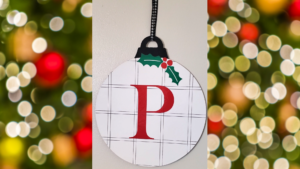
PROJECT #1 – PLAID, MONOGRAMMED ORNAMENT
The first piece I’m making is inspired by this plaid, monogrammed ornament plaque. As of this post, (Dec 2021) Kirkland’s has it on sale for $24, regularly $34.99.
In order to duplicate this look I’m using:
- An ornament plaque from Dollar Tree
- White chalk paint
- Black paint
- A black Sharpie
- My Cricut
- Small pieces of red and green vinyl
- Transfer tape
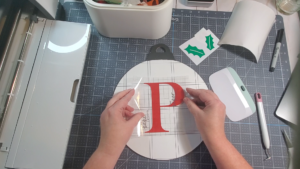
I started by painting two coats of white chalk paint on the back of the plaque. Then I painted the ornament cap with a coat of black.
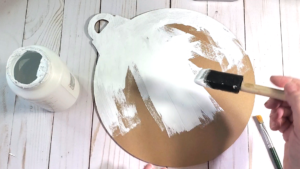
Once the paint had dried I lined up the plaque with the gride lines on my work mat and used some washi tape to hold it in place.
Then I drew my lines for the plaid pattern using my fine point Sharpie. The first set of lines I drew 2 ½ inches apart then I drew the second set 1/4 inch from the first.
I opened up Cricut Design Space and used the Baskerville Old Face font for my monogram and chose some holly leaves and berries from the images in Cricut Access.
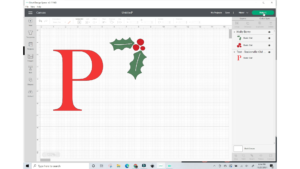
After the pieces, were weeded I topped them with transfer tape.
I applied the monogram to the center of the plaque and the holly leaves and berries were added to the top.
And project one is complete! What do you think? Let me know in the comments if you feel like this was a good substitute for the inspiration piece.
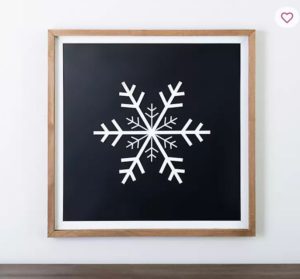
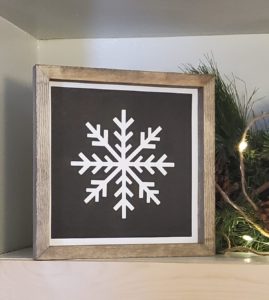
PROJECT #2 – SINGLE SNOWFLAKE WALL PLAQUE
I’m looking for a smaller sign to sit on a shelf but I’m using this 24” x 24” wall plaque from Kirkland’s as our inspiration.
For this project I used:
- 8“ x 8” square wood blanks from Amazon
- Waverly Antique Wax purchased at Walmart
- 2 pieces of cardstock – 1 white and 1 black
- My Cricut
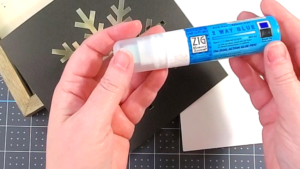
- Zig 2-Way Glue
To match the stained edge of the Kirkland’s piece, I went around the edge of the wood frame with a single, light coat of the Waverly Antique Wax and set it aside to dry for a bit.

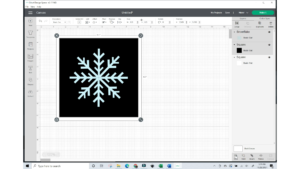
While that was drying, I pulled up Cricut Design Space and made a 7” x 7” white square to fill the inside of the wood frame.
Then I made another square that was 6 ½” x 6 ½” in black for the inset.
I searched through Cricut Access for a simple snowflake centered it on the black square and used the slice feature to cut the snowflake into the black square.
I cut both pieces of cardstock and applied some Zig 2-Way Glue to the back. The reason they call this 2-way glue is that it goes on wet and has a blue color to it. Used this way it gives you a permanent bond.
However, if you let it dry for a few minutes until the glue turns clear, you’ll have a removable bond. The kind like you have on the back of a post-it note.
I let the white cardstock dry completely so I can easily remove this paper later on and use the frame for another project or season.
I added the glue to the back of the black cardstock being certain to get some on all the cut pieces so they would lay nicely. Then I centered the black piece on top of the white and project 2 is complete.
It can’t get much simpler than that!
The inspiration piece is selling for around $45 and, since I already had cardstock and stain, I only had to pay $3 for the wood blank – saving myself $42, and was the perfect size for my shelf.
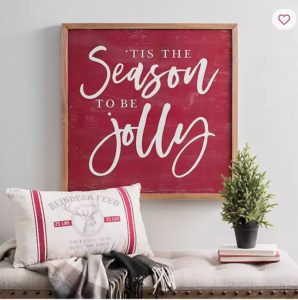
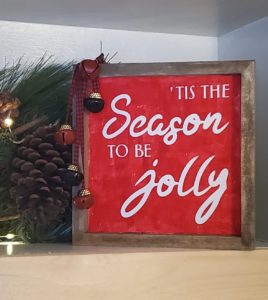
PROJECT #3 – ‘TIS THE SEASON TO BE JOLLY WOODEN PLAQUE
For the last project, I’m once again using a blank wooden frame to replicate this cute wall plaque.
Supplies needed for this project:
- 8“ x 8” square wood blanks from Amazon
- Waverly Antique Wax purchased at Walmart
- White chalk paint
- Folk Art Red Acrylic Paint
- My Cricut
- Small piece of white vinyl
- Transfer tape
I stained the edges as I did with the last project.
After letting the stain dry on the edges, I painted one coat of white chalk paint to the entire back of the box.
Once that had a chance to dry, I went over it with a single coat of Berry Red acrylic paint using a dry brush method. I wanted the white almost covered with just a bit showing through here and there.

While the paint was drying, I went into Design Space and added a red 7” x 7” square to use as a template while I created the design.
Taking a look at the original I chose two fonts that I felt looked close enough and typed out the saying.
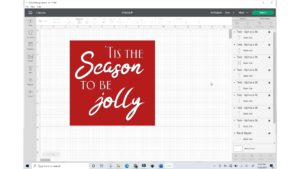
Once I had the letters laid out the way I wanted, I highlighted the entire design and used the weld feature so they would stay in the same position as they were cut.
After the cutting was complete, I weeded the vinyl and applied transfer tape to the top.
Carefully centering the design, I applied it to the back of the wood sign and project #3 is done!
I hope you enjoyed this Kirkland’s inspired video. If you did, be sure to give it a thumbs up! Also, subscribe so you don’t miss the fun holiday projects that will be coming next!
Thanks for joining me and I’ll see you next time, in the craft room.