MAKE CHRISTMAS CARDS WITH YOUR CRICUT
(Note: Some of the links provided are affiliate links. This means, at no additional cost to you, I will earn a commission if you click through and make a purchase. You can read our disclosure policy here.)
IN THIS TUTORIAL WE’RE MAKING 3 DIFFERENT CRICUT CHRISTMAS CARDS USING THREE DIFFERENT PROCESSES!

MAKE CHRISTMAS CARDS WITH YOUR CRICUT!
In this tutorial, we’re making 3 Christmas Cards with our Cricut cutting machines.

We’re adding a bit of bling to these cards using foil, pens, and Nuvo Drops!

ADD SOME HOLIDAY MAGIC TO YOUR CARDS USING FOIL, PENS, AND NUVO GLITTER DROPS
IF YOU PREFER VIDEO YOU CAN WATCH THE “MAKE CHRISTMAS CARDS WITH YOUR CRICUT” TUTORIAL HERE
CARD #1 – CRICUT FOIL TRANSFER KIT
MATERIALS & SUPPLIES NEEDED FOR CARD #1
- Your Cricut cutting machine
- Cutting mat
- Foil Transfer Sheets – these foil transfer sheets are fun and easy to work with and give such beautiful results!
- Foil Transfer Housing & Tips – this is a blue housing and the tips come in three sizes to choose from depending on how wide you want your line to be – fine, medium, or bold
- FREE SVG from my SVG library or a design from Cricut Access
- Blank Christmas cards
- Additional colored cardstock that we’ll apply our foil to
- Art glitter glue
DOWNLOAD THE FREE FILE HERE

If you’re not sure how to download my free SVG files and upload them into Cricut Design Space you can follow the easy instructions in this tutorial I created for you! CLICK HERE TO WATCH!
Before we jump into Design Space we need to measure the front of our blank Christmas card. My card measures 5” By 6 ½”. We’ll keep that in mind now as we design our card.
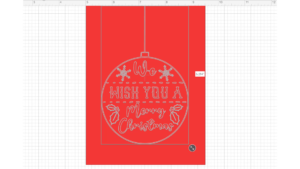
Once we’re in Design Space we’re going to start out by making a square. We’ll unlock the size and set our square to 4 ½ by 6 to give us a border of ¼ inch where the white card will show and frame the red.
Let’s change the color of the square to red to give a good visual of the finished project because we’re applying the foil to red cardstock.
If you’ve uploaded my FREE SVG you can add it to your canvas now by finding it in your upload folder. If you’re using another SVG, you can place that on your canvas or you can search Cricut Access for an image of your choice.
Grabbing the arrow button, adjust the size here on the image so that it looks well placed. Then just highlight both the square and the image and click on ALIGN and CENTER to be sure we have it perfectly centered.
Click on the design and change the process from basic cut to FOIL. You’ll see the options for fine, medium, or bold. You can use whichever one you like. I’m going to choose medium which means I’ll be putting the medium foil tip in the blue housing.
Highlighting both the cardstock square and the image select ATTACH so Cricut will know we’re putting this design on this piece of cardstock.
Now click MAKE IT.
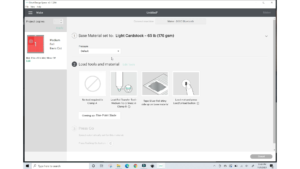
Following the instructions on our screen, we’ll select our cardstock and insert the blue foil tip housing which has our medium tip in clamp B.
It’s a good idea to always do a test piece to see how your machine is behaving with the weight of cardstock and pressure you’re using.
I’m going to set my pressure to less because I’ve noticed with the cardstock I’m using on my Cricut Maker the foil transfer sheet is tearing a bit. If you notice that you’re having the same issue you may want to try changing the pressure as well and see if that helps for your machine.
Place the red cardstock on your cutting mat. I prefer using the light blue mat for paper projects.
Take a look at our mat on the screen we can see where the foil transfer will be applied. We can compare that to our actual mat and lay the foil transfer sheet where it needs to be and tape that in place.
You don’t want your tape to cover any part of the foil design or it won’t transfer properly.
My design has the string for the ornament going all the way to the top of the cardstock so I’m putting my foil sheet and tape all the way up on the mat so that it won’t be in the way.
Try to get the foil laying as smoothly as possible because large wrinkles will interfere with the foil process. But don’t stress too much about it. Just no deep wrinkles.
Press GO and let the machine begin the foil process.
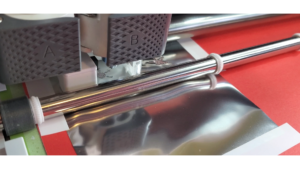
Once that’s done the machine will prompt you to change out the foil tip housing for the cutting blade. Without unloading the mat, change to the blade and let the machine cut the cardstock.
Once it’s cut, we’ll unload the machine and gently remove the foil transfer sheet from the cardstock.
And we have a perfect foil job!

Glue the back of the red cardstock to the card base. Just for some extra bling, I added a little silver bow. And there we have card #1 ready to go!
CARD #2 – CRICUT PENS
MATERIALS AND SUPPLIES NEEDED FOR CARD #2
- Your Cricut cutting machine
- Cutting mat
- Cricut Pens
- A design from Cricut Access or an SVG you like
- Blank Christmas cards
- Optional: Additional patterned cardstock for added color
- Art Glitter Glue
As you can see from the finished project at the top of this post, I added some pieces of patterned cardstock as a detail along the side of this card. You don’t need to do that if you don’t want to and your cards will still look beautiful. I added it by cutting a strip of the cardstock about 2 inches wide and the length of my card base and glued it right up against the edge of my card. I added a second piece of cardstock and cut the same size strip and add it to the side allowing about ¼ of an inch showing of our first patterned piece.
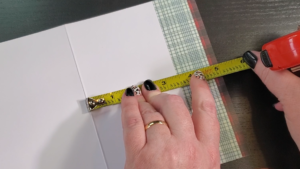
Before you jump into Design Space, measure the front of your card to see the size you’re able to use for your drawn design. In this case, I’ll need 4 3/8” by 6 ½” which leaves the border of our patterned cardstock showing as a nice detail.
Once we’re in Design Space we’re going to start out by making a square to the size we just measured.
Again you can change the color of the square to white for a good visual.
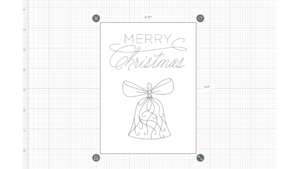
Click on images and look for a cute design for the front of your card. Under operation type, narrow it down to draw only then search for Christmas. I chose two designs. One was simply the sentiment of “Merry Christmas’ and the other was a holiday bell. Once you’ve selected your images you can add them to your canvas.
Now you can work with the placement of the images on the card base.
Once it’s laid out the way you’d like, highlight all the pieces together and click ATTACH.
Now click MAKE IT and CONTINUE.
Following the instructions on the screen, select cardstock and insert the pen in clamp A and the cutting blade in clamp B.
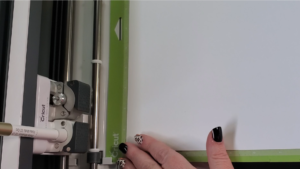
Place your cardstock onto the cutting mat.
Press Go and let the machine do its job.
Once that’s done, simply glue the piece to the front of your card and you’re all set!
Another beautiful card!

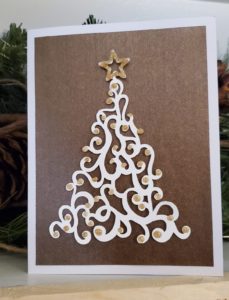
CARD #3 – NUVO GLITTER DROPS
We’re using gold paper as the bottom layer to this card so cut a piece about ¼ inch smaller on all sides than what the front of the card blank measures. This will leave us a nice border around the card and you can glue this piece to the top of the card blank.
Once in Design Space, you’re going to start out by making yet another square. This time making it 4 ½” by 6″ which is the size of the piece of gold paper on our card front.
Now click on IMAGES and search for Christmas trees. The image I used for this card is number M110FB7C2 in Cricut Design Space.
Once selected, add the image to your canvas.
Adjust the size of the Christmas tree so that it takes up a large portion of your square.
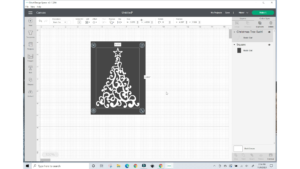
Click MAKE IT and CONTINUE.
Following the instructions on the screen, select cardstock. The cutting blade needs to be in clamp B.
Press GO.
Next, apply the Nuvo Drops to the circular ends on the tree where they’ll look like ornaments. Also, apply a thin line of the glitter drops to the star on top of the tree. Be sure to let the drops dry thoroughly. 24 hours is recommended.
Once it’s dry, apply adhesive foam dots to the back of the tree being careful that they don’t show from the front. Then, adhere the tree to the front of the gold paper on the card.
Beautiful!
I hope you had some fun and feel inspired to make Christmas cards with your Cricut this year!