HOW TO MAKE STICKERS WITH CRICUT
(Note: Some of the links provided are affiliate links. This means, at no additional cost to you, I will earn a commission if you click through and make a purchase. You can read our disclosure policy here.)
LEARN HOW TO MAKE STICKERS WITH CRICUT
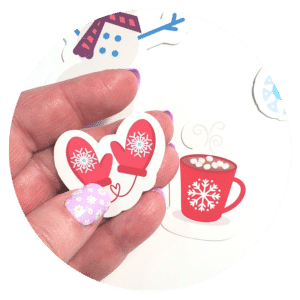
In this tutorial, we’re going to make die-cut stickers and full sticker sheets with our Cricut!
We’re going to be using StarCraft Matte Printable Adhesive Vinyl to make our sticker sheet and Neato Labels Matte Water Resistant Vinyl Labels to make our die-cut stickers.


MATERIALS & SUPPLIES FOR THIS PROJECT
- Cricut Machine
- Your home printer
- Starcraft Printable Vinyl or Neato Matte Vinyl Labels
- Designs from Design Space or SVGs to use as stickers
First, let’s grab some images that we’ll be using for these stickers.
To make it simple today I’m using images you can find in Cricut Design Space. But of course, you can use images you’ve purchased or SVG images you have if you’re not a Cricut Access Member.
Now if you search images in Design Space, you can see the little “A” in the top left corner of these images. That means it’s a Cricut Access image so if you’re an Access subscriber, they are free to use with your monthly subscription.
If you still want to use an image that doesn’t have the green “A” you can but before you go to cut or print the sticker sheet you will be charged a small fee for use of each image you’ve selected. Most are around .99 to $1.99 per image. You’ll notice most of these are 3rd party images like Disney or Star Wars, etc.
Just keep in mind, Cricut Access has over 200,000 images and they add more all the time. So, I’m sure you can find something free you like in there if you’re a subscriber.
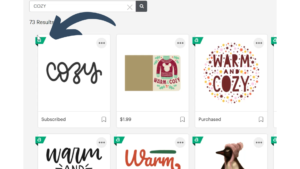
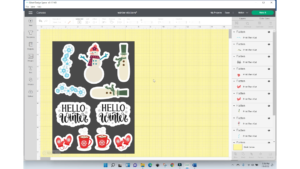
I’m going to search for some winter images to use in my planner spread for this month.
When you select an image, it shows up in the bottom bar. You can keep going and search for more images, select all the images you want and then hit “ADD TO CANVAS” once you’re done picking the ones you’ll be using.
Adding An Offset To The Stickers
Once back on the canvas with all the images I want, I’m going to spread them out a little so we can see each one individually. You may find that you need to hit “UNGROUP” if they’ve transferred over here as one group.
In order to see the offset colors a bit better while we work, go down to the bottom right corner and click on “BLANK CANVAS” to change the background color to yellow so that the offset will be easier to see.
Let’s pick out this first image and we’ll click the offset feature in the top toolbar to give us that nice white border around our images.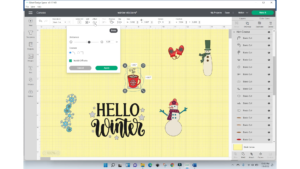
When you click on offset you can see this really thin line around the image. This is showing you how wide the offset will appear. You can move this slider ball to increase or decrease the width of the offset, or to be more precise, you can enter in the exact width in the “inches” box that you’d like the offset to be. Once you have the thickness set for the offset you will click “APPLY.”
Design Space automatically makes the offset black but you can change it to whatever color you’d like. To change the color, you’ll look in this layer’s panel to the right and find the shadow of your image and change the color to whatever you choose. I’m making these white for my planner.
Change The Image From A Cut Image To Print Then Cut
If you try to move your image you’ll notice that as of right now your offset and image are made up of multiple layers and you can move them around individually. You can also see in the layer’s panel that Cricut intends to cut each color out separately.
Now would be the time to make any changes to the images that you’d like. For instance, let’s say you want to change a particular part of an image to another color, you can select that layer in the layers panel and change the color in our top toolbar.
Once all your changes are made and you’re happy with how each one looks, you’ll need to highlight the image and the offset shadow together and in the lower right panel you’ll select “FLATTEN.” This makes it one solid object instead of multiple pieces and you’ll notice that the layer panel now lists this as a “Print Then Cut” object.

Using Contour To Create A Solid Offset
Now let’s make some changes to another image. We’ll use the “Hello Winter.” Once we hit the offset you can see where there are spaces left out and we don’t have a solid shadow under the image. If we leave it like this, the Cricut is going to make those tiny cuts in the middle of these stickers.

In order to have the Cricut just cut the outside line of the offset, you’ll want to highlight the offset shadow layer and click “CONTOUR” in the bottom right panel. You can choose to just eliminate a few of the spaces or you can hit “HIDE ALL CONTOURS” and it will make a solid offset for you.
Once you’re done, don’t forget to highlight both the offset and image together and hit “FLATTEN.”
What Is The Maximum Print Area For Print Then Cut Projects?
With print then cut you have a maximum print area of 9.25 inches by 6.75 inches. To ensure you get the most use from your sheet of printable vinyl you’ll need to grab a square and set it to those dimensions. Then pull your sticker images onto the square and adjust their size so they fit. Add or remove images until you feel comfortable that you’ve used the printable space as best as possible.
Once you have them arranged in a way that you get the most on your sheet of sticker paper you can delete the square.
One last step you won’t want to miss is to highlight all the stickers together and click “ATTACH.” This way the stickers will stay arranged the way you have them when you go to print.
Printing A Cricut Print Then Cut Project
Once you have them arranged in a way that you get the most out of your sheet of sticker paper you can delete the square.
One last step you won’t want to miss is to highlight all the stickers together and click “ATTACH.” This way the stickers will stay arranged the way you have them when you go to print.
Click “MAKE IT.” You’ll notice a black box is going to print. This allows your Cricut to read those borders so that it knows where to make the cuts. Also, the paper shows up as white on the mat so you sort of lose sight of white offsets but trust me, it’s still there.
Printing A Cricut Print Then Cut Project
Select “SEND TO PRINTER.” Be sure the correct printer is showing. The box will default to having the bleed on. Some people do turn this off. I leave it on because I feel it allows the cuts to be more accurate but you can try it both ways to see which you prefer.
You’ll want to turn on the system dialog box. This way when you hit “PRINT” you’ll see the system dialog settings appear and you can select the type of paper and the print quality.
I recommend selecting photo paper or premium paper (whichever your computer has an option for) as well as high-quality printing.
Place your sheet of sticker paper into your printer.
Go ahead now and print.
What Setting Do You Use To Get A Kiss Cut On A Sheet Of Stickers?
Once it’s done printing, Cricut will ask for your material selection and you’ll choose “Sticky Note.” This setting will give it the kiss cut where it will cut through the sticker paper but not all the way through the backing. Like it does when cutting vinyl or htv.
What Setting Do You Use To Cut Die Cut Stickers With Your Cricut?
Now if you’d prefer to have individual stickers when you choose your material setting, you’ll select the medium cardstock setting. You may also want to select more pressure. I found that works best on my machine. That should cut them through completely and leave you with a set of individually cut stickers.
Tip For Cutting Print Then Cut Projects
If you have an Explore Air 2 the Cricut may have trouble reading the black registration box on glossy sticker paper. If this happens, you can add a clear matte tape over the black lines to give them a matte finish so the Explore can properly read it.